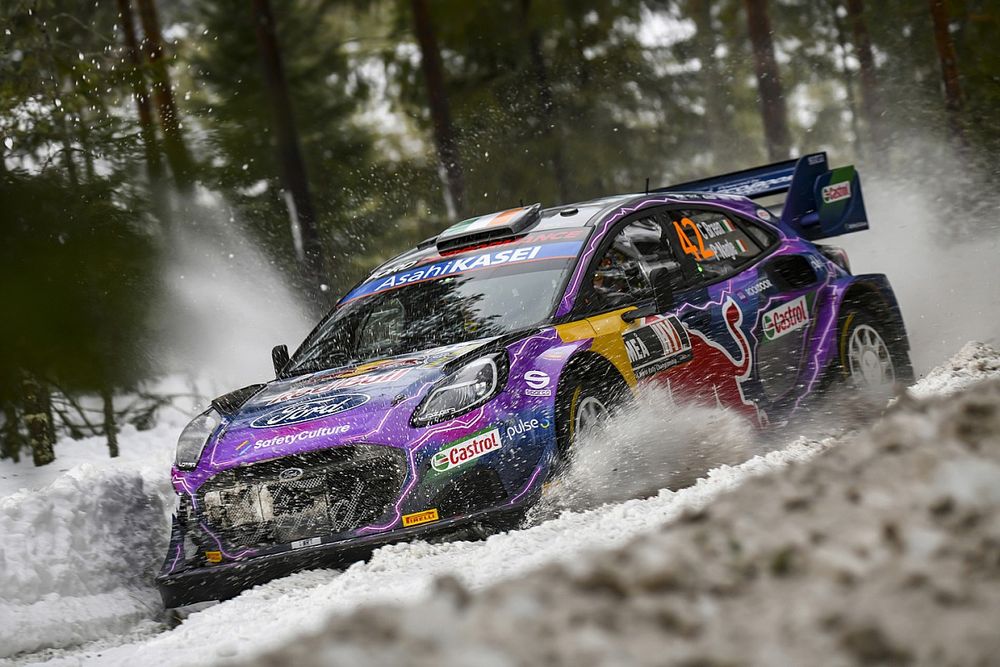
Craig Breen plowing through the snow at Rally Sweden 2022 [1]
A step by step guide to building a braking model of a car
By Trav Mays
How do you know if you are braking at the maximum potential of your car? Well, we can calculate the theoretical max braking force and then back our way out from that to find the fluid pressure that corresponds to that braking force. Using real world data, we can then compare what we are generating to what we could potentially generate. We can use this data to optimise our brake set up for a track, or to check to see we are using all of the braking potential.
To do this we firstly need some basic info about the car
And some sensors to monitor what’s going on
That’s it, we don’t need much to get a pretty good idea of what our max braking potential is, but with a little more info, we can narrow in on reality. As we go through the process I'll highlight some examples of where we can add detail to etch out the true potential.
The theoretical max braking potential assumes a lot, so don’t take the result too seriously, more of a guide, one you can trust with more confidence the better the model you build.
To do this we firstly need some basic info about the car
- Race weight (car full of fluids and driver) on all corners
- Wheelbase
- Front and rear rolling radius (floor to the centre of the wheel)
- Centre of gravity height
- Front and rear brake rotor radius (or effective radius)
- Front and rear brake pad coefficient of friction
- Front and rear brake piston radius
- Front and rear tyre coefficient of friction
And some sensors to monitor what’s going on
- G Force sensor
- Brake line pressure
That’s it, we don’t need much to get a pretty good idea of what our max braking potential is, but with a little more info, we can narrow in on reality. As we go through the process I'll highlight some examples of where we can add detail to etch out the true potential.
The theoretical max braking potential assumes a lot, so don’t take the result too seriously, more of a guide, one you can trust with more confidence the better the model you build.
Step 1 - Total braking force
The first thing we need to calculate is the max braking force for each tyre, that is the maximum braking force before the tyre brakes traction.

These two variables are quite loaded and difficult to model accurately, but we can get pretty close without going too over the top.
1.1 - Tyre model
A tyre’s coefficient of friction changes due to load, temperature, slip ratio, speed, inflation pressures, the moon cycle, someone looking at it funny, day of the week, everything alters the coefficient of friction, it’s very fragile. So depending on how advanced your tyre model is, you can add all of that, part, or none in this step, and simply use the effective value given to you by the manufacturer. If you’d like to learn more about a tyre’s coefficient of friction, head over to my series on tyres, Link Here
![Effect of (from top left) load [1], temp [2], slip ratio [3], and speed [4] on a tyre’s coefficient of friction Effect of (from top left) load [1], temp [2], slip ratio [3], and speed [4] on a tyre’s coefficient of friction](https://blogger.googleusercontent.com/img/b/R29vZ2xl/AVvXsEhaV5FhEQ7rYrnyIVCiXexkfoR8daDrM8ZplvWBjyQuyHomWzaFyIjDk1x83eoqHteLpzAj1XhDE3oOCB2CdgCCal6efwvaCs0ZkFWD1sJtyYPHy5nhjSo-xn3Ux0EZ9myBeSSoGZlqvryIAOZbaRBZZUpJ-YK2qtnHSkMCITDh-OnyvTfmmawx-p8L/s16000/Pic%202.png)
Effect of (from top left) load [2], temp [3], slip ratio [4], and speed [5] on a tyre’s coefficient of friction
1.2 - Dynamic Weight
A car’s weight changes as we go around a track, a static weight will not give us a very accurate idea of our braking potential. To get as accurate a model as possible, we need to take into account load transfer, aero, drag, inertia, grade, and gradient. But if you don’t have much aero, or much info about your car or the track, using just the static weight and adding to it the load transfer will get a reasonable result.
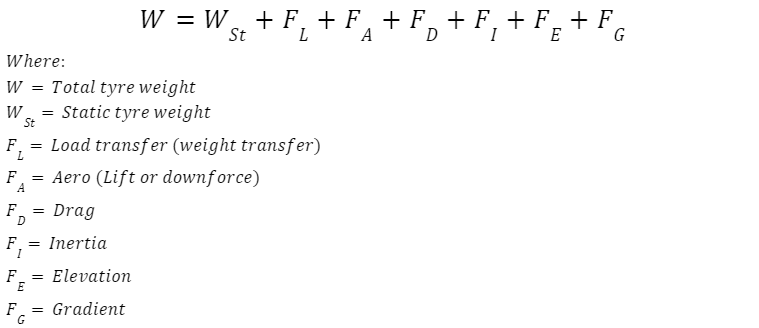
Let's go through each quickly
1.2.1 - Load Transfer
When we slam on the brakes we shift load from the rear to the front, increasing our front axle dynamic weight, giving us more front axle braking potential, but robbing it from the rear. We therefore need to add this step in if we want to get anywhere near a correct result, it’s a very simple step but adds greatly to the accuracy.
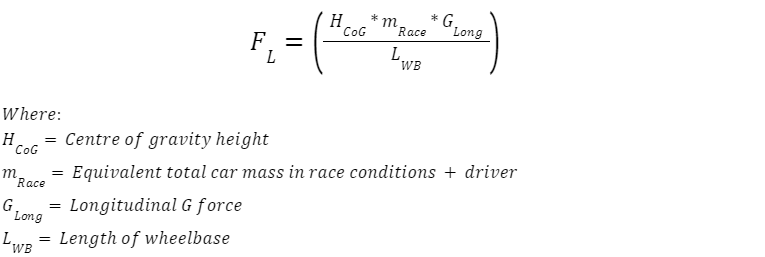
One thing to look out for if you are using SI units is to add in the gravitational acceleration constant, converting the G force to m/sec^2.
***Potential for more accuracy***





Brake line pressure graphs

[2] Li, L. 2014, ‘Comprehensive tire–road friction coefficient estimation based on signal fusion method under complex maneuvering operations’, Link, retrieved on 11/03/22***Potential for more accuracy***
- Instead of total car static weight, you can use the adjusted fuel load weight as the fuel is burnt. You could keep this simple and do a linear relationship, or depending on your fuel burn model, you could use the value you calculated by recording the amount of fuel and its temperature as it goes in and out of the car. Cross reference this with the ECU measured value, and you now have a fuel burn model that can be used to take into account in, out, and safety car laps.
- The position of the CoG will change with different suspension setups and as the fuel is burnt (especially if you have a rear mounted tank), taking these into account will help to paint a better picture.
1.2.2 - Aero (Lift or Downforce)
The faster we go, the more downforce we make, the more load we have on each wheel, the more braking potential we have. If you have a car with little aero load, either downforce or lift, you could ignore this step as it shouldn’t affect the results too much. But if you are generating a moderate amount of either, this could have huge effects on the accuracy in the high speed sections. As you can see below, the amount of downforce generated is heavily influenced by the speed we are going, if we double the speed, we quadruple the downforce (or lift).

Hopefully you have a coefficient of lift for the front and rear, or at least an aero balance figure, you can then simply divide the total axle lift force by 2 for each wheel. If you don’t, simply dividing the lift across both axles will be a lot better than not including it.
***Potential for more accuracy***
***Potential for more accuracy***
- If you have an aero map of your car and damper pots, you can better model the lift or downforce being generated as the car’s ride height and rake change.
- Recording the direction and velocity of the wind as well as the air's density allows you to correct for changes in either
1.2.3 - Drag
This one is pretty much the same as the aero equation, the only difference is the coefficient of drag.
You can simply divide the total car’s value by 4 to get the drag at each tyre.

***Potential for more accuracy***

- If you have an aero map of your car and damper pots, you can better model the drag being generated as the car’s ride height and rake change.
- Recording the direction and velocity of the wind allows you to either add or minus it from the car velocity, allowing you to correct for it.
1.2.4 - Inertia
When things get going, they don’t typically like to stop, so when we apply the brakes, we are fighting against these forces, which shifts load to the front axle, giving us more front axle braking potential. If you want to add in inertial forces, it’s not too difficult, we just add the sum of all of the car’s inertias divided by the dynamic wheel radius squared to the static vehicle mass in the load transfer equation.

Including the inertia from just the wheel is fairly simple, we can get a fair approximation, if we don’t have a CAD file, from the following

***Potential for more accuracy***
- If you are able to log the gear selected, you can include the inertia from the complete driveline and the engine
1.2.5 - Grade and gradient
Tracks aren’t flat, lucky for us taking into account the elevation (grade) and gradient changes and with them the load shift is fairly simple. To include them both, we use the following formula

This shift in weight means our perpendicular weight has changed, we can account for that by using the following for our static weight

1.2.6 - Bringing it all together
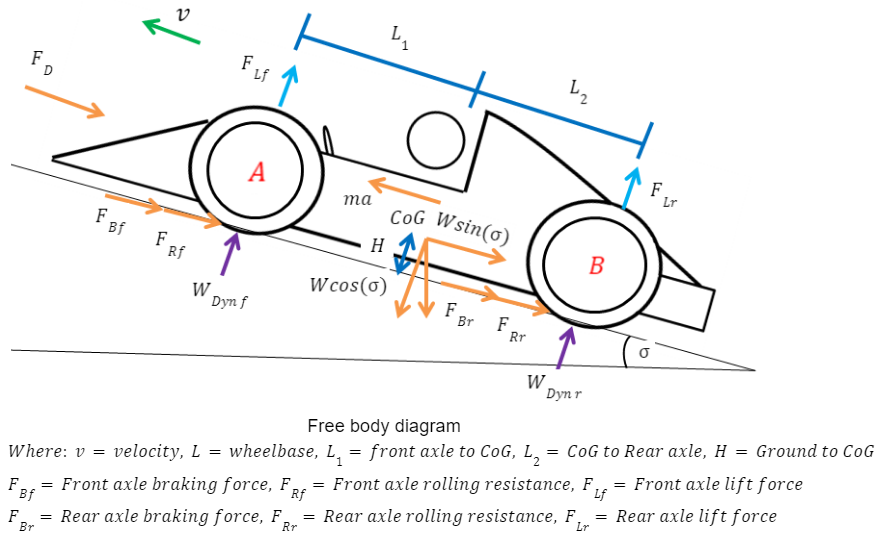
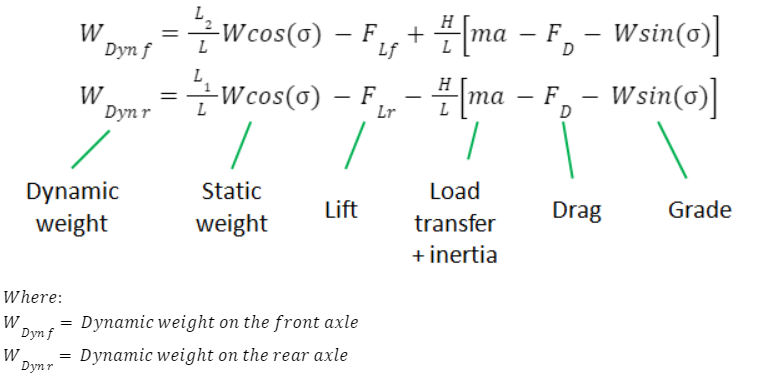
Now that we have calculated the individual forces, we just need to apply them to the front and rear axles and then split them further into each wheel. To do that, we draw a free body diagram

Solve the forces along the X axis

And take the moments about A and B to get the following equations for the dynamic weight on the front and rear axle.

Now that we have these, we just need to split them one step further to get the individual wheel weights. To do that, simply multiply them by the CoG Y direction offset and the gradient value, below is just the driver side front axle wheel. If you don’t have this, you can check out my video on how to calculate it here, or you can just divide it by two.

Step 2 - Brake Torque
Now that we have calculated the total braking force that our car can make, the next step is to calculate the brake torque. We simply multiply the total braking force by the dynamic wheel radius

Step 3 - Clamping force
The next step is to convert our brake torque to the clamping force

The rotor effective radius is just the centre of the brake pad area, you can calculate it by

***Potential for more accuracy***
- The brake pad and rotor coefficient of friction doesn’t stay constant, it will vary with temp
Step 4 - Brake Line Pressure
The last step is to divide our clamping force by the total piston area to get our brake line pressure

Here I have assumed there are no brake line pressure losses in the system, the pressure used to move the pistons, creating the clamping force, is the same as what is being measured upstream. Clearly this isn’t the case, so there is potential for more accuracy here, especially if we included temperature effects.
***Potential for more accuracy***
***Potential for more accuracy***
- Pad compressibility
- Calliper flex
- Fluid compressibility
- Hose expansion
- Connection losses
- Pipe length losses
Step 5 - Graph it
Now that we have created the theoretical max brake line pressures, the next step is to put it on a scatter plot and with it, our measured brake line pressures. Below I have plotted the front and rear theoretical brake line pressure for a formula ford, taking into account load transfer, drag, lift, and the wheel inertia in blue, just load transfer in orange, and measured brake line pressures in green. As you can see, keeping it simple and just using the load transfer, if you don’t have much aero, can get you a fairly accurate result.

Brake line pressure graphs
Step 6 - Validate the model
Hopefully you have wheel speed sensors, or know when you have locked up the brakes in the past, that way you can validate your model. No doubt you’ll need to tweak some of the variables, especially the tyre and brake pad coefficients of friction.
Step 7 - Analysis
And now for the fun part, here you get to look at all the data and play around with different scenarios. Depending on how advanced your model is, you can model all sorts of changes to set up, aero, tyre changes, brake pad changes, speed changes, different tracks, different corners, all sorts, the list is endless. If you’d like to see an example, head over to this blog post “Braken’ Ain’t Easy” for some examples.
Math Channel Equations
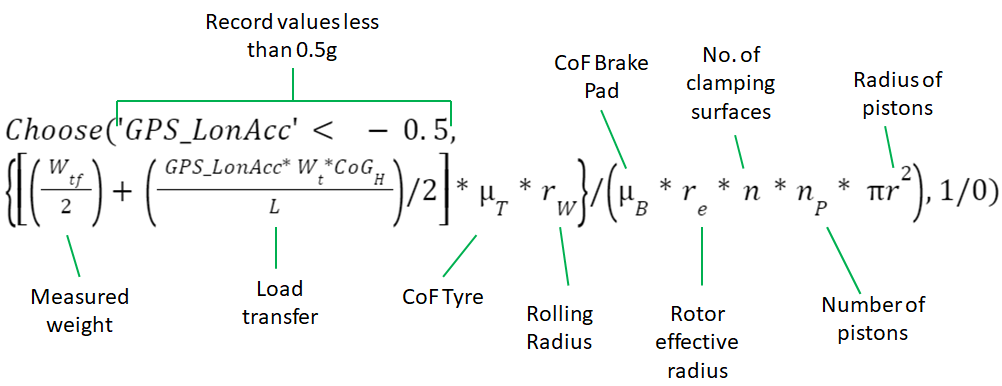
I’ve put some simple math channel equations for the front and rear axles below, taking into account just the static weight and load transfer. You’ll need to update the variables, constants, and less than value, for it to work for you, but I think this is a good approximation of what’s going on, and a good base for you to build off if you’d like.
Aim Race Studio

Motec i2

That’s it for today, but there are still more options for increasing accuracy, below are a couple more that I couldn’t fit in anywhere else.
***Potential for more accuracy***
I hope you enjoyed it, if you did, have any comments, suggestions, or noticed I made a mistake, let me know in the comments, get in contact via email, or connect with me here, I’d love to hear it. If you’d like to read more, check out some of the other articles on this site or if you'd rather watch, check out my youtube site, we have some more articles and videos you might like.
Thanks for reading and I hope you have a great day.
***Potential for more accuracy***
- If you have the engine torque map of your car, you can also include engine braking.
- Brake fade hasn’t been taken into account, I’m not sure of a way to do this reliably and accurately enough, but I'm sure someone knows how to. If you do, I'd love to hear it.
I hope you enjoyed it, if you did, have any comments, suggestions, or noticed I made a mistake, let me know in the comments, get in contact via email, or connect with me here, I’d love to hear it. If you’d like to read more, check out some of the other articles on this site or if you'd rather watch, check out my youtube site, we have some more articles and videos you might like.
Thanks for reading and I hope you have a great day.
By Trav Mays
Previous Post Next Post
[3] Michelin, The Tyre Grip, Link, retrieved on 03/03/22
[4] Balkwill, J. 2017, 'Performance Vehicle Dynamics'
[5] Anupam, K. 2021, 3-D Thermomechanical Tire–Pavement Interaction Model for Evaluation of Pavement Skid Resistance, Link, retrieved on 11/03/22


No comments:
Post a Comment